Add a Paycode to Excuse an Absence
Work with paycodes
Paycodes organize time or money that you earn and identify spans of time for payroll purposes.
- Duration paycodes are day- or hour-based and accrue time. For example, they can be used for vacation or sick time.
- Money paycodes accrue monetary amounts. They can be used for a bonus.
- Cascading paycodes charge or debit amounts across multiple accrual codes.
- Cascading paycodes consist of a parent paycode and a number of children paycodes that are related to the accruals that the cascading edit cascades through. Only the parent cascading paycode appears in the timecard body. The cascade itself appears in the Totals tab.
Paycodes can be tracked as productive time or as non-productive time, which does not appear as totaled hours. Productive time can be included or not included in the total scheduled hours.
Paycodes in hourly timecards
Add or edit a paycode
- Select the appropriate day.
- In the day detail panel, tap Add Paycode.
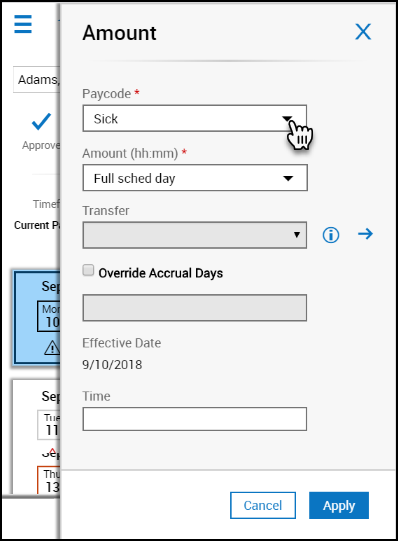
- In the Amount panel, do the following:
- Select a paycode from the Paycode drop-down list.
- For hour or money paycodes, enter the appropriate value in the Amount field.
- For duration paycodes, enter the time associated with the paycode in either of the following ways:
- Enter the starting time in the Time field and the ending time in the End Time field.
- Enter a symbolic amount, such as Full Sched Day or Half Sched Day, in the Amount field.
- Tap Apply and then tap Save.
When changing paycodes, note the following:
- The associated amount on each day is set to blank when you are changing paycode types.
- Any comments associated with the amounts are applied to the new paycode type.
- Any transfer associated with a paycode is kept and applied to the new paycode type.
- If a paycode is changed to another type and no new amount is entered, the paycode edit is deleted when you tap Save.
- If a paycode is changed to another type and then back to the first paycode, the previously entered data is lost and must be re-entered. However, if you tap Cancel or Refresh before you tap Save, the original data is returned.
- When a paycode is changed to another type and an invalid amount is entered, the paycode edit is deleted when you tap Save. However, if you enter multiple amounts, the valid amounts are saved when you tap Save.
Work with paycodes
Paycodes organize time or money that you earn and identify spans of time for payroll purposes.
- Duration paycodes are day- or hour-based and accrue time. For example, they can be used for vacation or sick time.
- Money paycodes accrue monetary amounts. They can be used for a bonus.
- Cascading paycodes charge or debit amounts across multiple accrual codes.
- Cascading paycodes consist of a parent paycode and a number of children paycodes that are related to the accruals that the cascading edit cascades through. Only the parent cascading paycode appears in the timecard body. The cascade itself appears in the Totals tab.
Paycodes can be tracked as productive time or as non-productive time, which does not appear as totaled hours. Productive time can be included or not included in the total scheduled hours.
Paycodes in project timecards
The project timecard is used by employees who charge time to projects instead of entering precise in and out times. Each project consists of a paycode and, if necessary, a transfer. By default, your primary job is defined as "home." If you add a paycode without adding a transfer, your projects are listed as follows:
- Home - Sick
- Home - Vacation
- Home - Development
- Home - Hours worked
If you transfer the paycode to a different business structure, work rule, cost center, or labor category, the transfer replaces "home" in the project name, for example:
- CC_Production - Hours worked
- Administration - Development
Add a project
- Select a day. The employee detail panel opens with the projects already used are listed in the Project Amount area. To apply time to one of these projects, enter the applicable time next to the project name and tap Save.
- To add a new project, tap Add Project.
- In the Project panel, select the paycode from the Paycode drop-down list.
- Enter the amount.
- If necessary, select a transfer from the most recently used Transfer drop-down list or click the arrow
 to open the Transfer panel, where you can select a business structure, work rule, cost center or labor category. When finished, tap Submit.
 - Tap Apply.
- In the employee detail panel, tap Save.
Note: All the projects listed in the previous pay period are listed by default in the current and next pay periods.
Edit a project
If you have charged time to a project and need to apply the time to a different project:
- Select the day that contains the project you need to change. The employee detail panel opens and displays the following information in the Project Amount area:
- The project and hours charged on that day as well as any exceptions.
- The projects defined but not yet charged on that day.
- To change or apply time to of these projects, enter the applicable time next to the project name and tap Save. You can also tap More Actions
 and select from the following:
- Edit Project — The Amount panel opens where you can change the paycode, amount, or time, or make a transfer.
- Delete Project — The project is removed from the list.
- Add Comment — The Comment panel opens, where you can select a comment from the drop-down list and add one or more notes.
- Tap Save.
Delete a project
- Select the day that contains the project you need to delete. The employee detail panel opens and displays the following information in the Project Amount area:
- The project and hours charged on that day as well as any exceptions.
- The projects defined but not yet charged on that day.
- To delete one of these projects, tap More Actions and select Delete Project.
- Tap Save.
